There are several ways to move data from one Mac to the other, as well as a few options for moving files to / from iOS devices. If both devices are close to each other, the easiest and also most efficient way to achieve this is to use AirDrop.
How to Make Use of AirDrop
AirDrop is available on Macs & iOS devices produced after 2012. In this tutorial, I’ll teach you how to utilise AirDrop to transfer data between your devices swiftly and securely. I’ll also show you how to set up AirDrop so that you don’t acquire possibly harmful files from strangers.
AirDrop’s Operation
To securely send data, AirDrop employs a unique mix of technologies. It finds devices to send to using Bluetooth, and the device sending the file establishes a secured peer-to-peer Wi-Fi net connection with receiving device then transfers the file (s). You don’t have to be on a Wi-Fi network to utilise AirDrop because it doesn’t use the Internet or a local Wi-Fi network. This makes it useful in situations where you would need to transfer files from an iPhone to a MacBook Pro, such as in the field.
File sizes are unrestricted, and files are sent as quickly as their unique technology allows. You don’t share bandwidth with anybody because you’re not exchanging things across a network. I tested AirDrop by transferring a one-gigabyte file from one iMac to my MacBook Air in 36 seconds.
If the devices are further away (they were both on the desk), and if there is interference from other devices nearby, this will take longer. AirDrop also only works with devices within 10 metres (30 feet) of each other since it utilises Bluetooth to establish a connection (the Bluetooth distance restriction is 10 metres), then forms a peer-to-peer Wi-Fi network.
How to Make Use of AirDrop
AirDrop is the most convenient way to transfer data across devices. Both devices must have Bluetooth and Wi-Fi turned on to utilise AirDrop, but neither device should be operating as a personal hotspot. There are two methods to utilise AirDrop on the Mac. The first is to open the Finder and navigate to Go > AirDrop, or press Command-Shift-R to open AirDrop. A window displays the devices that can receive files. (To show, all devices must be awake: Macs cannot be asleep, while iOS devices must have their screens turned on.) A file may be dragged and dropped across one of the icons. A notice will be sent to the other device. On a Mac, it appears as follows.The notification on an iOS device looks like this:
If you transmit a photo to a Mac using AirDrop, the recipient will have two options for saving it. They can store it to their Download folder if they click Accept. It is saved to their Photographs library if users select Open in Photos. Photos will be saved to a Photos app on an iOS device, while other file types will provide a selection of apps to access the file, depending on the file type.
The Sharing menu is another option to transmit files using AirDrop. Tap the Share button on iOS, and the AirDrop area will populate with any nearby devices that can receive files. Right-click a file on your Mac, then select Share > AirDrop to open up a box asking which device you wish to transmit the file to. You may also transmit files in addition to files. You can share web sites from a computer, tweets via a Twitter client, and music through the iOS Music app, among other things. You can share things with AirDrop everywhere you see the play button little square with some upward arrow.
How Can I Keep AirDrop Safe?
When sharing a file, any device within reach that can receive files will appear in AirDrop dialogues, as previously stated. These might be your devices (for example, if you wish to transmit a file from your iPhone to your Mac) or devices belonging to friends, coworkers, or even strangers. As a result, it’s critical to set up AirDrop in a secure manner.
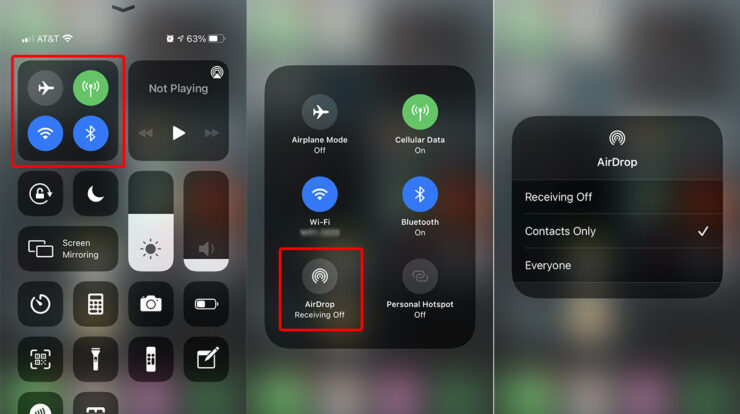
To accomplish this on a Mac, open AirDrop (Go > AirDrop in the Finder), then click “Allow me to be discovered by” at the bottom of the Finder window. There are three options: No One (which disables AirDrop), Contacts Only (which only shows your AirDrop devices to individuals in your contacts and utilises the Apple IDs in Contacts), and Everyone (which shows your AirDrop devices to everyone) (which means, well, anyone within range).
To make this modification on iOS, head to Settings > General > AirDrop.This should definitely not be set to Everyone. When you do, you risk obtaining files that you didn’t request. These might be pornographic photographs sent to you by others, or malicious files. If you’re at a meeting somebody who isn’t in your contacts wants to give you a file.
you may also want to temporarily switch the setting to Everyone, but remember to switch it back afterwards. On a Mac, AirDrop is fundamentally more secure that file sharing, which might allow an attacker to get access to your computer.
If you travel frequently, you should disable file transfer on your laptop since anybody with access to a public Wi-Fi network might access your Mac, but AirDrop’s 10m/30ft limit aspects relevant more difficult. AirDrop is the most convenient way to move files and other items between Apple devices. I use it frequently across my Macs, iPhone, and iPad, as well as with people who own Apple products. It’s quick, it’s not picky, and it’s dependable if you keep it safe.
Using iTunes File Sharing, you may transfer files from your Mac to your iPhone
File sharing programmes allow you to transfer files across your Mac and iPhone. Check the documentation of an app to determine if it supports this functionality.
Step 1 :
Connect your smartphone to your computer.
Step 2:
On your Mac, select the “Device” button just above side of the iTunes window in the iTunes software.
Step 3:
Select “File Sharing” from the drop-down menu.
Step 4:
From of the list just on left, choose the app to which you wish to transfer a file.
Step 5:
Begin transferring files from your iPhone to your Mac. To transfer files from your Mac to your iPhone, go to “Add,” choose the file you wish to transfer, and then click “Add.” To transmit files from your iPhone to your Mac, go to the right-hand list and choose the file you would like to send, then click “Store to” and choose where you can save it. After that, click “Save To” one again.
When it’s finished, you may look at the documents in the appropriate app or location. AirDrop allows you to transfer files from your Mac to your iPhone or vice versa.Photos, videos, sites, locations, and much more are all supported files. On iOS devices & Macs, AirDrop is the constructed file-sharing software. With AirDrop turned on, you can share files over Bluetooth or Wi-Fi between 2 iOS devices between or an iOS device and a Mac. Contacts can be transferred from iPhone to iPhone using AirDrop, photographs can be sent from Mac to iPhone via AirDrop, and so on. As a result, utilising AirDrop to transfer files from your iPhone and Mac is convenient. To use AirDrop to transmit files between an iPhone and a Mac, follow these steps:
Step 1:
Enable AirDrop on your iPhone or iPad. On your iOS device, go to “Control Center.” Make absolutely sure both “Bluetooth” & “Wi-Fi” are turned on, then touch “AirDrop” and choose whether “Contacts Just” or “Everyone” should be able to find your iPhone.
Step 2:
On your Mac, enable AirDrop. To enable AirDrop on your Mac, go to “Finder” > “Go” > “AirDrop” and turn on “Bluetooth” and “WiFi.” “Allow to be discovered by” should be set to “Everyone” or “Contacts Only.”
Step 3:
To exchange files between your Mac and your iPhone/iPad, use AirDrop.
You may now easily share files from your Mac to your iphone using AirDrop. With AirDrop, you can send files from your Mac to your iPhone in two ways. (An example is moving images from a Mac to an iphone.)
- Drag and drop the photographs you wish to transmit from Mac to iPhone onto the recipient’s image, then click “Send.”
- Alternatively, you may use an App’s “Share” button, choose “AirDrop,” select the recipient, and then click “Done.”
- How to use AirDrop to transfer files between an iPhone and a Mac
- If AirDrop isn’t functioning on your iPhone, here’s what you should do.
Email Files from a Mac to an iPhone or an iPhone to a Mac
Photos, videos, and documents are all supported. Any file that can be attached to an email may be moved from your Mac to your iPhone. If you wish to transmit files from your Mac to your iPhone, start a new email on your computer, attach the files you want to send, then forward the email to your very own account. Check your email on your iPhone after that, and then transfer the contents to your iOS device. Create an email address to send it to the Mac through the Email app if you wish to transmit files from such an iPhone to a Mac.
Depending on size of the files and the strength of the network connection, methods like AirDrop or email may take a long time to transmit data. If you only need to transmit a few files of a modest size, these solutions are advised.If not, look into alternative options that can save you a lot of time.
iCloud Drive allows you to sync files between your iPhone and Mac. Word documents, PowerPoint presentations, Excel spreadsheets, and other files are all supported. Users may utilise iCloud Drive to save files in the cloud and access them from iCloud.com, Macs, PCs, and iOS devices. You have complete control over which folders and files are saved in iCloud Drive. You may access these files on all of your devices with the same Apple ID if you enable iCloud Drive. (If your iCloud Drive isn’t syncing, first read this article to discover how to fix it.) To use iCloud Drive to sync files between your iPhone and Mac, follow these steps.
Step 1:
On your iPhone and Mac, enable iCloud Drive.
On an iPhone, go to “Settings” > [your name] > “iCloud” and switch on “iCloud Drive” at the bottom.
On a Mac, go to the Menu that appears > “System Preferences” > “iCloud” > “iCloud Drive,” and then pick it.
Step 2:
From the source device, upload the files you want to transfer to iCloud Drive.
Step 3:
On the target device, download the files to iCloud Drive.
If you’re not sure how to upload or download data from iCloud Drive, consult the Apple Support user handbook for instructions.
Check Also : How To See Who Shared Your Post On Facebook